Product FAQ
-
Venting Materials
As the manufacturer of the Ole Hickory Pits smokers, the recommended materials for constructing the 4" or 6" flue pipe, as well as the 10" diameter smoke evacuator and should comply with local building and fire safety codes, and at the minimum should be made of 16-gauge steel, single wall, with fire wrap insulation applied where this passes through a combustible ceiling.
The 4" or 6" flue pipe should be installed as straight vertically as possible, with any offsets not to exceed 45 degrees. Any offsets should be avoided as they will increase the frequency that the flue needs to be cleaned from at least every six months to every three months. The height of the flue pipe should be at least 4' above the roof line and anything within a 10' radius, with a rain cap that flows freely out the sides.
-
Exhaust Fan
The exhaust fan used with the smoke evacuator should comply with local codes and be rated at around 700 CGM for models EL-ES, EL-EC, EL, EL-IB, SSM or SSG. Please contact your sales representative or our service department for help with compatibility.
The exhaust fan should be rated at around 1100 CFM for models EL-ED, EL-EW, SSJ-AE, SSJ, SRO, SSM, SSRD or SSE. Please contact your sales representative or our service department to ensure compatibility.
The electrical power for the exhaust fan should come from the actuator motor electric box on the damper assembly. Connect the black and white wires for the exhaust fan to the screw terminals of the actuator motor, adding the black wire to the black wire and the white wire to the white wire.
-
Smoke Evacuator Operation
Purpose
The purpose of the smoke evacuator system is to remove the smoke directly from the cooking chamber when the doors have been opened, preventing smoke from entering the kitchen or food processing area when the doors are opened. This allows the operator to add or remove product in a relatively smoke-free environment.
Operaton
The smoke evacuator system is activated automatically when the cooking chamber doors are opened and remains on until the doors are closed. The operator may choose to begin the process by pressing the manual push button briefly before opening the doors.
Components
The smoke evacuator system is made of up four basic components:
- The switch
- The powered damper assembly
- The 10" diameter duct
- The centrifugal up blast exhaust fan
Items 1 and 2 are sold by Ole Hickory Pits as optional equipment. Items 3 and 4 are purchased by the customer.
-
Smoke Evacuator Installation
The following line drawings give information for typical smoke evacuator installations. View this PDF file to download these useful instructions:
Download -
Adding the Exhaust Fan
Adding the centrifugal upblast exhaust fan
The SMOKE EVACUATOR option that can be added to the OLE HICKORY PITS smoker needs to have a centrifugal up-blast exhaust fan installed (normally on the roof directly above the smoker). This exhaust fan is what pulls the smoke out of the smoker to prevent the smoke from going into the kitchen. It is important to select the proper size exhaust fan depending on the model of the smoker. (SEE EXHAUST FAN BELOW) The exhaust fan will be attached to a roof curb that is attached to the roof.
If installing the smoker through the wall and the smoke evacuator will not have to be installed on a roof, a fan flange adapter can be purchased to install the exhaust fan directly onto the smoke evacuator assembly.
Models EL-ES, EL-EC, EL, EL-IS, SSM, SSG, & SDL These smokers should use an exhaust fan rated at 700 CFM.
Models EL-ED, EL-EW, SSG, SSE, SSJ-AE, SSJ, SSO, & SRO These smokers should use an exhaust fan rated at 1100 CFM.
Exhaust Fan
The exhaust fan used with the smoke evacuator should be rated at around 700 CFM for models EL-ES, EL-EC, EL EL-18, SSM, or SSG.
The exhaust fan should be rated at around 1100 CFM for models EL-ED, EL-EW, SSJ-AE, SSJ, SRO, SSM, SSRD, or SSE.
The electrical power for the exhaust fan should come from the actuator motor electric box on the damper assembly. Connect the black and white wires for the exhaust fan to the screw terminals of the actuator motor, adding the black wire to the black wire and the white wire to the white wire.
Wiring the exhaust fan
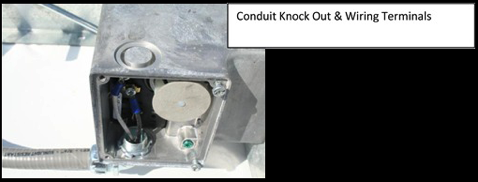
The power to the exhaust fan should come from the damper assembly electrical box of the smoke evacuator. This will allow the damper assembly and exhaust fan to both operate at the same time. Connect the power wires from the exhaust fan to the terminals inside the damper motor, black to black and white to white. There is a conduit knock out hole in the top of the motor enclosure to access the wiring on the damper motor.
Venting materials
As the manufacturer of the OLE HICKORY PITS smokers, the recommended materials for constructing the 4" or 6" flue pipe as well as the 10" diameter smoke evacuator duct should be made of 16 gauge steel, single wall with fire wrap insulation applied where this passes through a combustible ceiling.
The 4" or 6" flue pipe, depending on model, should be installed as straight up as possible, with any offsets not to exceed 45 degrees. Any offsets that are installed will increase the frequency that the flue needs to be cleaned from at least every 6 months to every 3 months. Height of the flue pipe should be at least 4' above the roof line and anything within a 10' radius, with a rain cap that flows freely out the sides.
-
Conversion Kit Instructions
P 265 Burners
Unscrew pipe union right below the gas control valve.
Unplug the wires from the gas control valve, blue on top, white, and red on bottom. The green ground wire is next to this all by itself. Also unplug the orange spark wire from the ignition module.
Unscrew the pilot tube fitting from the burner end.
Remove the two ½” head hex bolts that hold the gas train bracket to the burner. The main orifice is directly behind this bracket and unscrews using an 11/16” wrench.
Remove the 4 screws from the flat plate on the front of the burner. Pull the guts of the burner out and turn over to get to the pilot orifice. Follow the copper tube to the pilot assembly and loosen the tubing nut. Remove the 2 phillips screws that are holding the pilot assembly and finish removing the tube. Tap the pilot assembly on a counter and the old orifice will drop out. Install the new orifice inserting the pointed end in first. Screw the tube back on and replace the 2 phillips screws as well as the pilot shield. Slide the burner assembly back into the hole and replace the 4 screws.
Reattach the gas train bolts and reconnect the pilot tube to the burner, plug the wires back in on the gas valve.
The pressure adjusting screw on the gas control valve is under a protective cap in the back, left side of the gas valve. Unscrew the cap and completely remove the adjusting screw and spring from the gas valve.
Follow the instructions with the kit to install new spring and screw.
-
How do I clean an Ole Hickory Pit?
Ole Hickory Pits has designed the units to be as easy as possible to clean. The interior is sloped to allow for the meat drippings to be drained through a 2” pipe drain and collected into the customer’s rendering tank or grease drains. Spray the interior with a de-greasing agent while the unit is warm. Then spray the racks and interior after allowing the de-greasing agent to work for the required time. A degreasing agent may not be required if you use a high-pressure washer on the interior.
However, extreme caution should be used when using a high pressure washing device to avoid damage to gaskets, electrical and thermostatic components.
-
Firebox Loading Procedure
-
CTO Installation
-
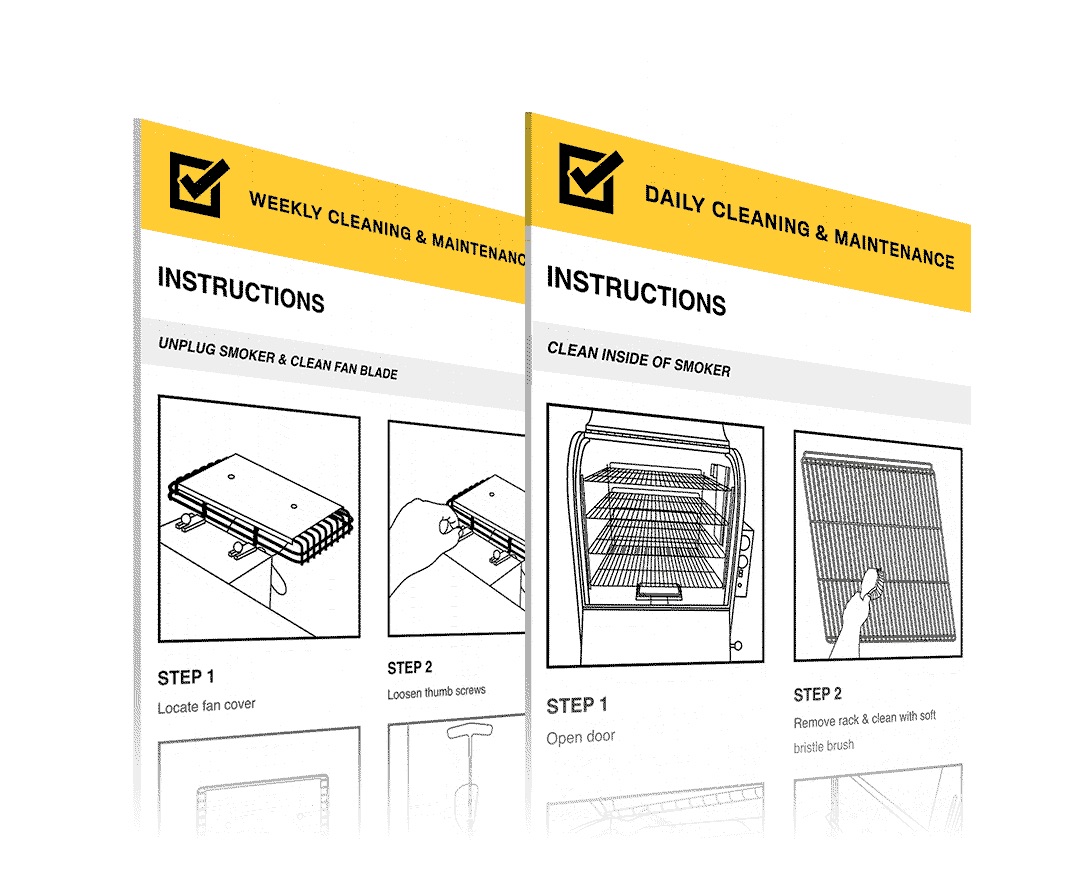
CTO Maintenance & Cleaning
-
CTO Grease Drain Removal
Learn how to remove your CTO grease drain.
-
EL-EDX Faced Through Wall


-
Installation Guidelines
The following guidelines are general in nature and can vary, depending on the model of the Ole Hickory Pits smoker. Keep in mind that your local inspectors will have the final say when it comes to approving the installation at your location. Building codes vary in different cities so it is best to consult your local inspectors before starting the installation. Download -
CTO Maintenance Guide
Keep your CTO or CTO-DW running longer and stronger with our regular cleaning & maintenance guide. Download the CTO Maintenance Guide »